Custom QuickLinks in SailPoint IdentityIQ
- gzachodin
- Jan 31, 2023
- 4 min read
Hello, everyone. In this post, we'll be discussing how add a custom QuickLink to a SailPoint IdentityIQ instance.
I recently implemented a QuickLink tool and figured it would be a useful thing to document for everyone. So for our purposes of our example, we want a new QuickLink tool that can transfer accounts from one Identity to another.
So, how are we going to accomplish this? Well, we basically need two (or three) things: A new QuickLink object, and a new Workflow that the QuickLink triggers. The workflow will also contain a form to prompt the requester.
So, let's dive right in. feel free to use these links to skip around:
#1: Create a Workflow that moves accounts
Navigate to Setup -> Business Processes
Give your workflow a name (we'll use "Move Accounts") and change its type to "IdentityLifecycle"

In the Process Variables tab, add a variable (we'll call it "requester"). This variable will be set by clicking the QuickLink we'll create later.

In the Process Designer tab, add a Start step, 2 generic steps (one will display a form, one will move the accounts), and an End step. Set up the transitions between them.

Now, right click on the first generic step and click "Add Form". In the form, give it a name at the top left and expand the details by clicking "Details" at the top right, we'll be using that later.
Now, you can structure your form with however many sections you like, but we want to end up with 2 fields and 2 buttons somewhere. Here's what our form looks like:

Click on the Edit button for your first field (this is going to represent the Identity we want to move accounts from), give it a name, a display name, change the type to Identity, and ensure it's a required field:

Now do the same with your second field (the Identity we'll be moving accounts to):

For the buttons, we want to be able to cancel and move forward. Give them display name and appropriate actions:


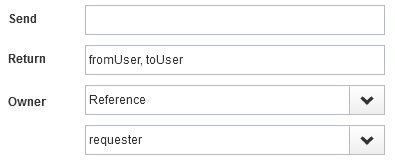
Now we can go back to the details on top. We want the form to return our two Identity fields, so enter the field names in the Return field, separated by commas. We also need to assign the form owner as the person who launched the workflow so that the form is actually visible to them. Make sure the Owner reference matches process variable you created earlier:

And that should be all we have to do with our form. Save it, and let's move on to the next workflow step!
Right click on our second generic step and click "Edit Step". All we need to to write a script to move the accounts between identities, so give the step a name, click "Open Editor", and paste in the following code:
import sailpoint.object.*;
Identity fromIdentity= context.getObject(Identity.class, fromUser);
Identity toIdentity = context.getObject(Identity.class, toUser);

List links = fromIdentity.getLinks();
for (Link link : links)
{
  link.setIdentity(toIdentity);
}
context.saveObject(fromIdentity);
context.saveObject(toIdentity);
context.commitTransaction();
As you can see in the second and third lines, this script uses the "fromUser" and "toUser" fields that we returned from our form (make sure to change the the names if they don't match the name you used for the fields in your form). It then gets all of the accounts from the "fromUser" and then sets the "toUser" to each one.
Save the script, save the step, and save the workflow. We're finally ready for the next step!
#2: Create the QuickLink that launches the workflow
Optional: Create a Custom QuickLink
Perhaps you don't want your QuickLink to appear under one of the out-of-the-box categories?
Not a problem. Log into an admin account and navigate to the IIQ debug page at:
http://<hostname>:<port>/identityiq/debug, and click on Configuration Objects -> System Configuration.

Search for the "quickLinkCategories" entry key, and using an existing category as a base, simply add another. Pay attention to the ordering:

Don't forget to save!
While we're still in the debug page, let's create our QuickLink object. On the right, click "Select an Action" -> "New" and paste the following code:
<?xml version='1.0' encoding='UTF-8'?>
<!DOCTYPE QuickLink PUBLIC "sailpoint.dtd" "sailpoint.dtd">
<QuickLink action="workflow" category="Custom" messageKey="Move Accounts" name="Move Accounts QuickLink" ordering="1">
  <Attributes>
    <Map>
      <entry key="httpSession">
        <value>
          <Script>
            <Source>
import javax.faces.context.FacesContext;
import javax.servlet.http.HttpSession;
log.info("======= Inside QuickLink ========== ");
FacesContext fc = FacesContext.getCurrentInstance();
HttpSession session = fc.getExternalContext().getSession(true);
return session;
</Source>
          </Script>
        </value>
      </entry>
      <entry key="requester">
        <value>
          <Script>
            <Source>
return currentUser.getName();
</Source>
          </Script>
        </value>
      </entry>
      <entry key="workflowName" value="Move Accounts"/>
    </Map>
  </Attributes>
</QuickLink>
Ensure that the "category" attribute matches the QuickLink category you want it to be under. In this case we're using the "Custom" category from our optional step. "messageKey" will be the text displayed on the QuickLink. Don't forget to mind the ordering.
As you can see near the end of the cold, the QuickLink initializes the "requester" process variable from the workflow as the current user.
Lastly, ensure that the "workflowName" matches the name of our workflow from Step 1.
Don't forget to save!
And that's all there is to it! We hope that this guide proves useful to you!
- Gil

Comments